


Daily news, dev blogs, and stories from Game Developer straight to your inbox
Sponsored By
Amin Montazeri
January 29, 2024
22 Min Read
You may sit and scroll up a lot of blockouts or final levels on social media day after day, hour after hour, BUT…
How about their design process?
How do their creators reach that kind of level?
Why did they decide to shape the blockout in that way?
Could you break it down and figure out the basic layout?
It’s not that easy!
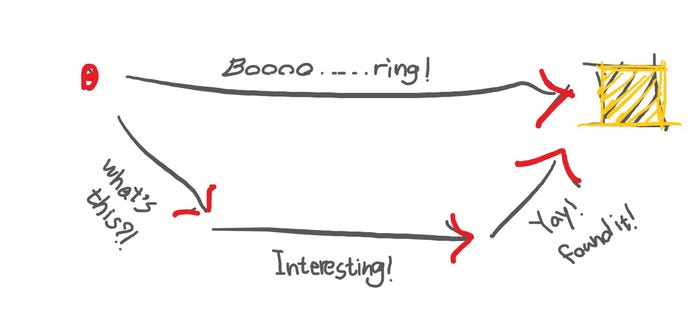
It’s like when you eat a delicious food without knowing its recipe. Experiencing a good taste is NOT enough to make a similar one. You should understand about the entire process; from the fundamentals to polishing the product.

(Credit)
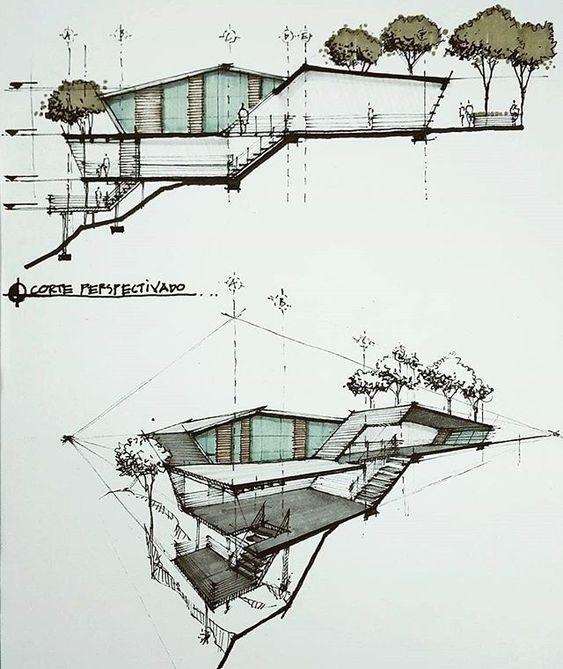
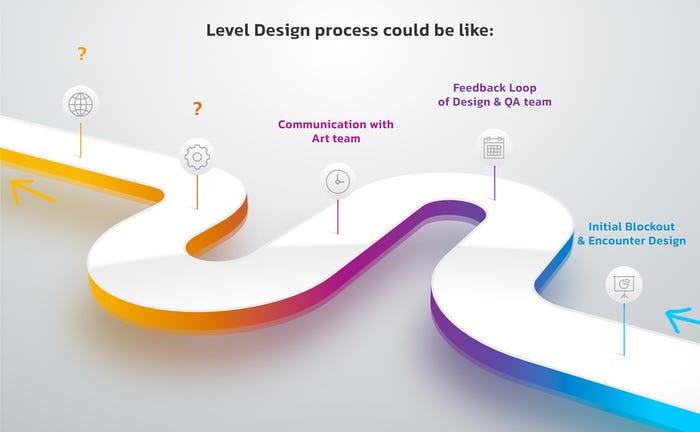
This image perfectly explains what I'm trying to say:

(Credit)
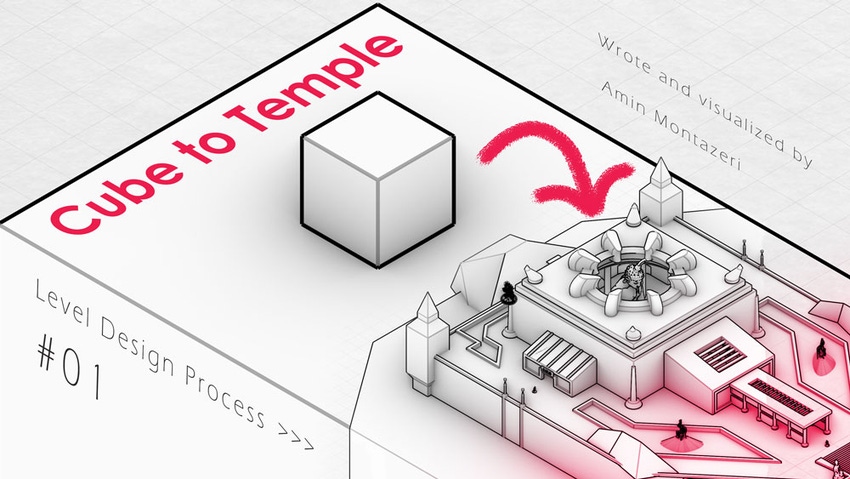
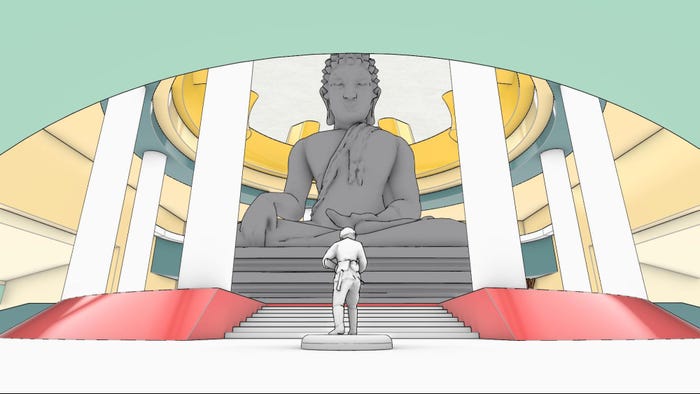
That’s why I started a visualized article series about the level design process and this one you’re reading is the first one. In this episode, I’ll transform the simplest shape in the world, Mr. CUBE, into an advanced TEMPLE in twelve steps.
📹 Let’s see a quick trailer of this article:
The complete process in a GIF:
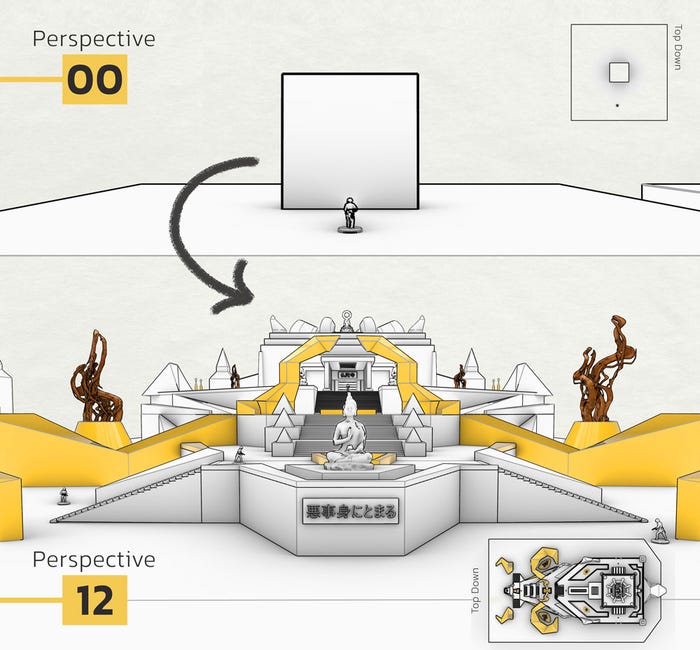
The first and last «perspective» view in one shot:
💡 Before we get started,
Please pay attention to these notes:
1- This method I used in this article (step by step) is ONLY for educational matters. I myself, as a writer of this article, don’t use this method for my work. Yes, that’s right!My goal is to explain and visualize these concepts to newcomers through an easy and attractive way as possible, not the best one!
🔸 Question:
Well, what’s the right way to do level design?
You’ll find it in the senior's feedback at the end of the article.
2- I skipped the reference gathering step for the matters of article capacity. That step has its own long process, but don’t worry! I’ll show some good ones within the process.
3- The target game is NOT specified, because my goal was NOT to design a specific level for a specific game. I was trying to share common useful tips (which most of them have a connection to architecture) you can use in most games, no matter what the genre, or it’s singleplayer or multiplayer.
4- I did NOT care about the art theme that much, so don’t blame me for the mixed elements in the level! However, the main theme I was looking for is east Asian style, but I didn’t spend so much time on it to make it perfect. Not my job!
5- That soldier JUST plays a mannequin role as a player reference. Don’t bother imagining it in a different shape. Japanese Samurai, Nordic warriors, etc.
🔸 Question:
What’s the goal of the player in this tutorial?
It can be in different setup, Let’s picture them together:
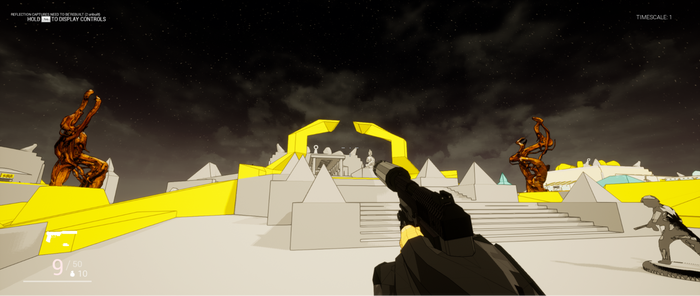
1) FPS setup like the «Far Cry» series: A player has a mission to hunt a boss with a lot of guards around him.
2) Third-person action adventure setup like the «Tomb Raider» series: A player has a torch on a heavy rainy night, who’s looking for a mysterious thing in a temple.
3) Isometric action setup like the «Diablo» series: A player starts with the goal of finding the boss castle or a place for exploring and finding lots of loot.
Alright, Shall we begin? Lessgo!
_________
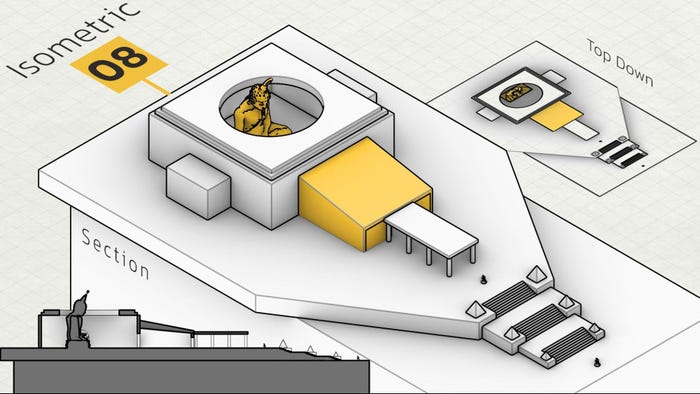
● Step 00:
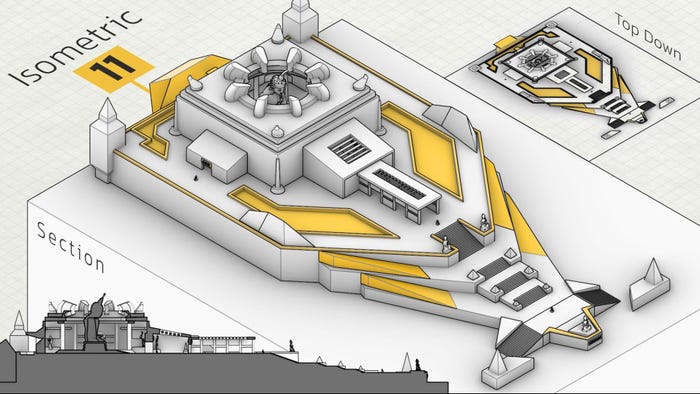
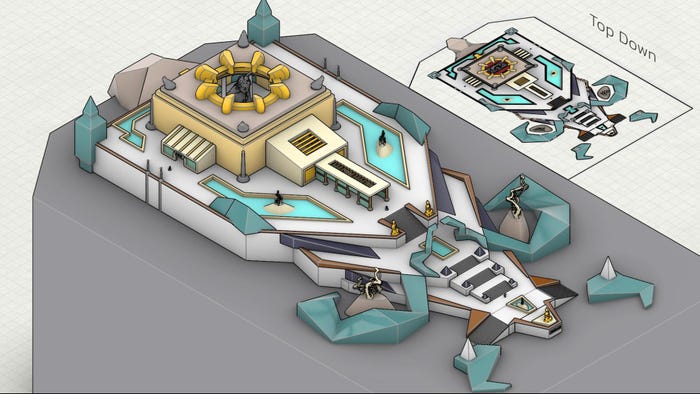
This is our gentleman, Mr. Cube!
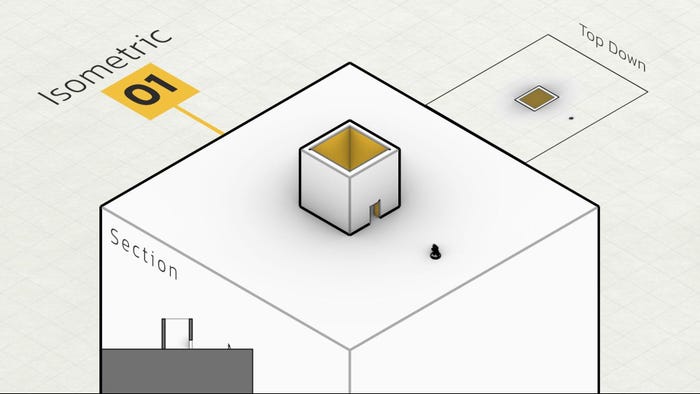
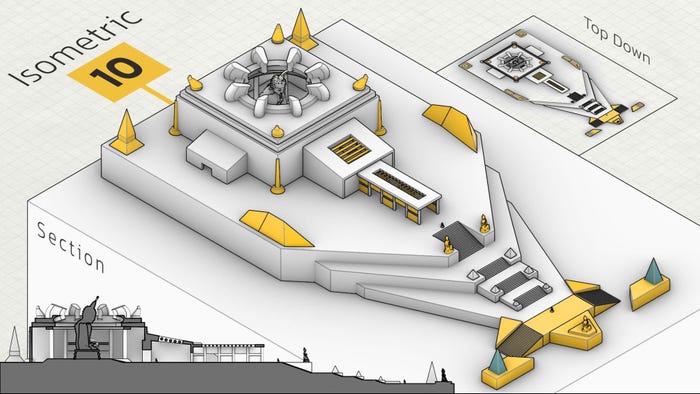
I collage 3 images into one: Isometric view, top down and section. That’s how I’ll present the complete process. Please pay attention to all three images with the same value to understand the design better.

🔸 Question:
How about sketching the layout on paper? Why did you jump on 3D software in the first place?
I’m really a fan of sketching and do it a lot in my workflow, but I have to skip that step like reference gathering for the capacity of the article.
Of course, there’s a fact you should know: Some level designers don’t consider that step necessary in their process.
_________
● Step 01:
What’s the connection between the cube and the player?
What do we expect that cube to become in the end?
What’s the story behind this place?
You should think about all of these questions and should be answered in your mind before or during the design process.
Until then, let’s make a simple space inside of Mr. cube with two holes:
1- One for making a door
2- One for making a room
🔸 Question:
What about metrics? How much is the door’s height?
Metrics define the core mechanics and player’s scale. In this tutorial, I picked up a standard player reference and built everything based on his metrics.Also, the door’s height will be bigger in next steps, so knowing that information is not useful for you now.
_________
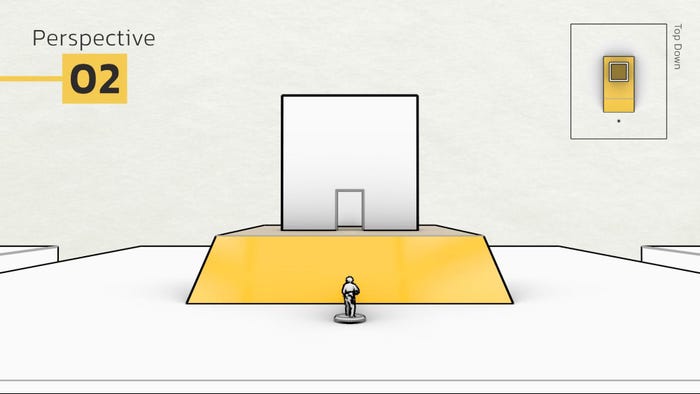
● Step 02:
You can give more «value» to anything by placing it higher than the ground floor. Since our target is a holy thing, this action is critical to remember.
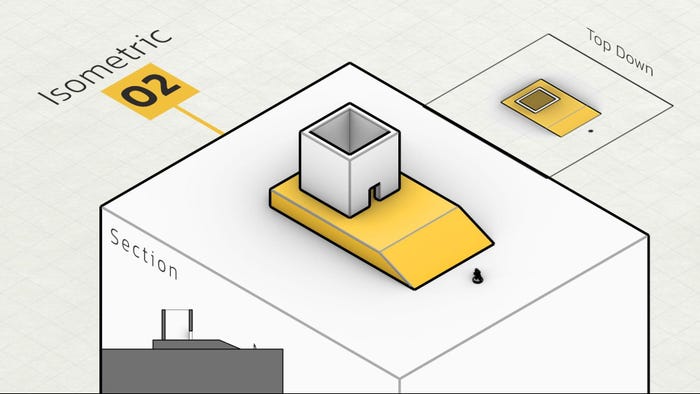
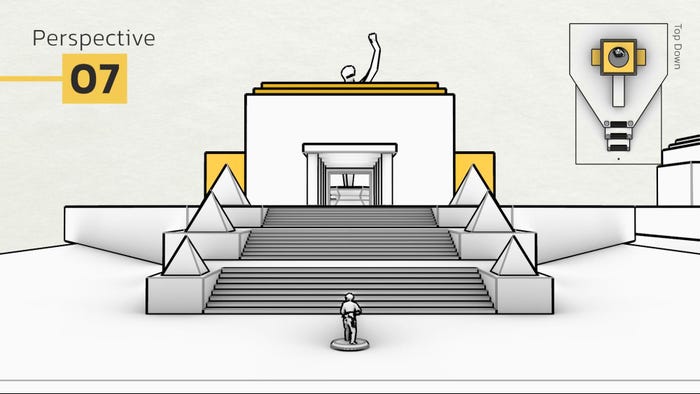
+ Perspective view:
🔸 Question:
How much height should I give it to?
Well, it depends on different things! How important is it in your level? Is it the primary objective or a side mission? How much do you want to impress the player by that thing? Is it just a little or a lot?
Answering these questions will give you the overall view on it.
🔸 Question:
How do I answer those questions?!
Gathering references helps you a lot in this journey.
Here’s a real example (Chichen Itza, Mexico):
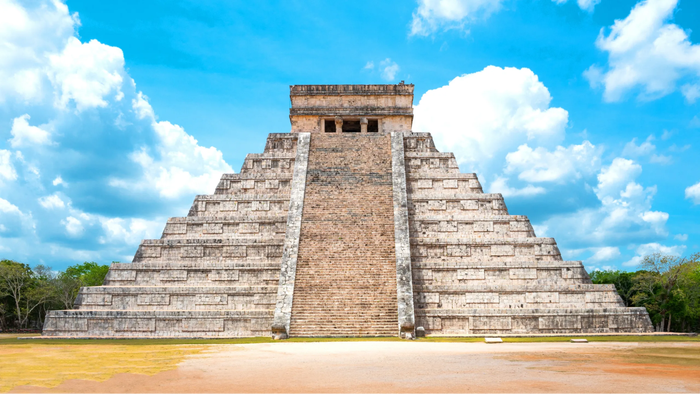
(Credit)
🔸 Question:
Is it always necessary to do this to give our target a value?
Of course NOT! All of these tricks are just a suggestion and in the end, it's up to YOU whether to use them.
_________
● Step 03:
Any building's "entrance" is just as significant as the main structure. In this step, I emphasize the importance of the entry by defining a staircase with two pyramids on it.
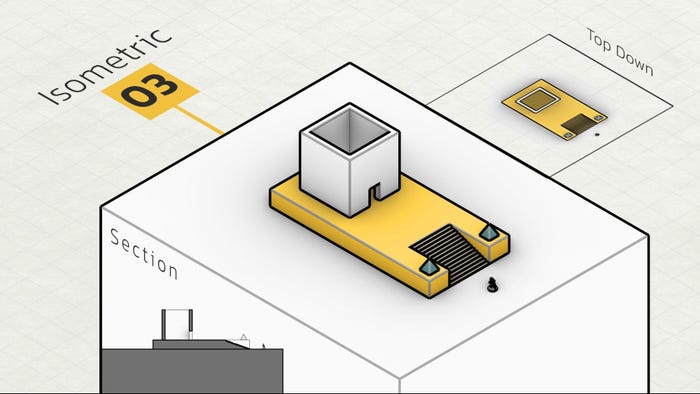
+ Perspective view:
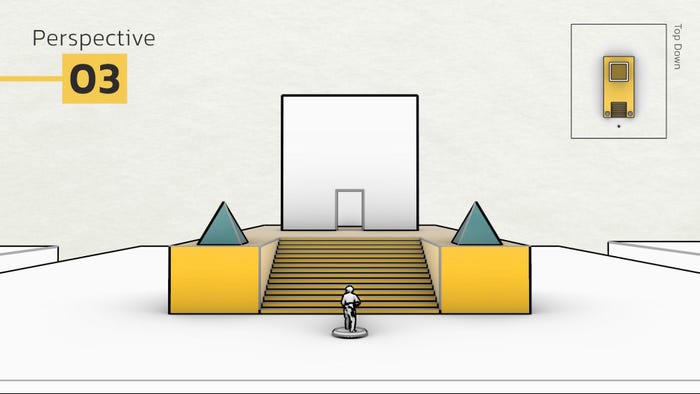
Of course, you can imagine better objects instead of those pyramids. Something like a small statue to introduce the contents (Theme) of the temple’s inside.
_________
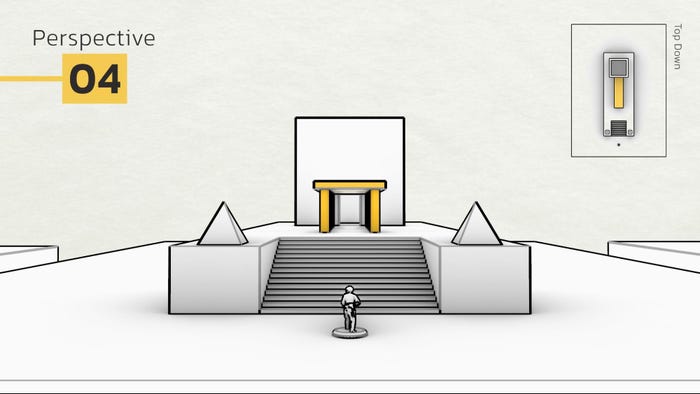
● Step 04:
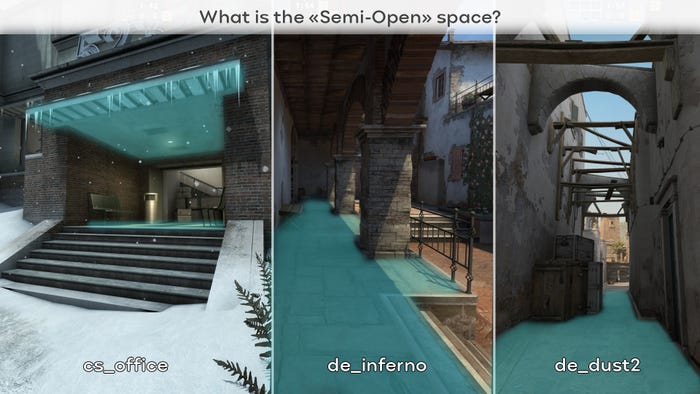
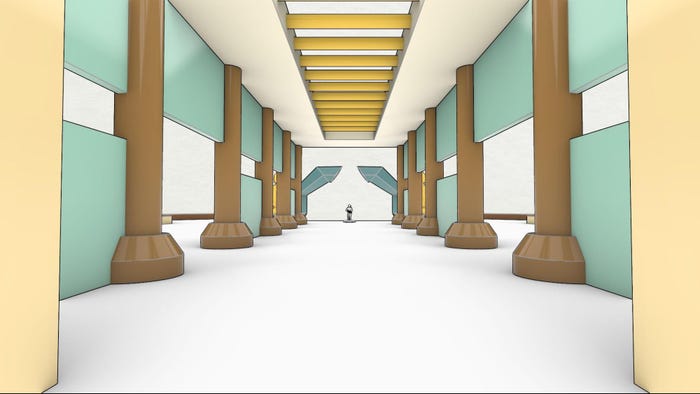
«Semi-open» spaces always add more variety to anything. I just placed a stretched volume and some columns under it as a pre-entrance.
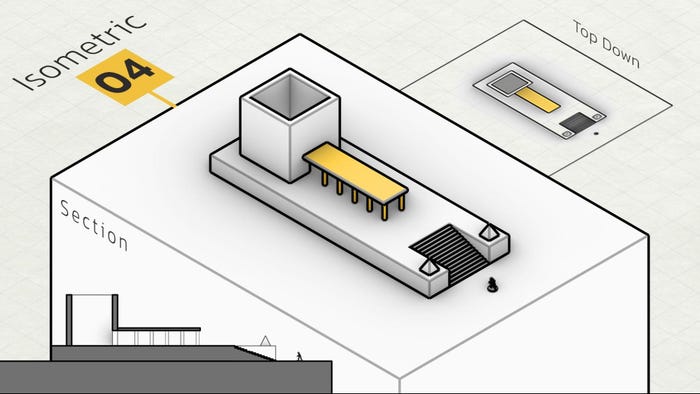
+ Perspective view:
🔸 Question:
What exactly is a semi-open space?
We have four kinds of space:
1)Open 2)Semi-open 3)Semi-close 4)Closed
A while ago, I tweeted some examples from CS:GO:
These lessons are completely under cover of the architecture field and if you like to learn more about it, I recommend reading "Architecture: Form, Space, and Order". It’s an interesting visual book that you won't get bored of reading. (it updated to 5th edition in 2023)
_________
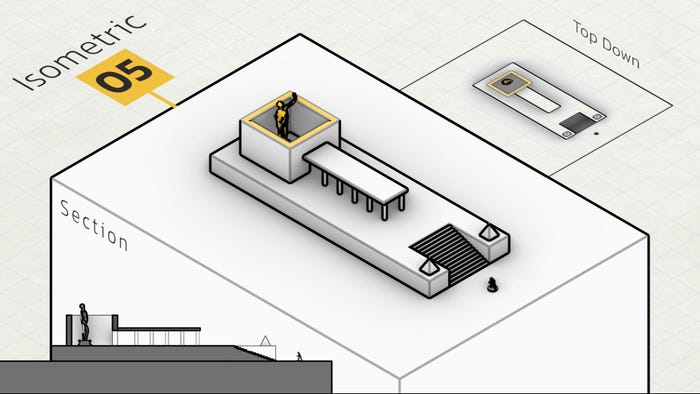
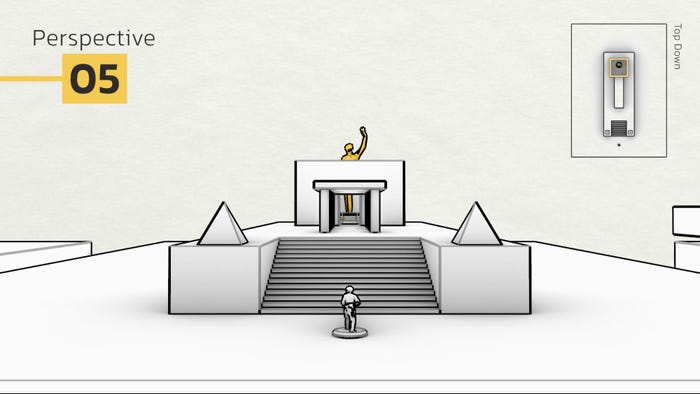
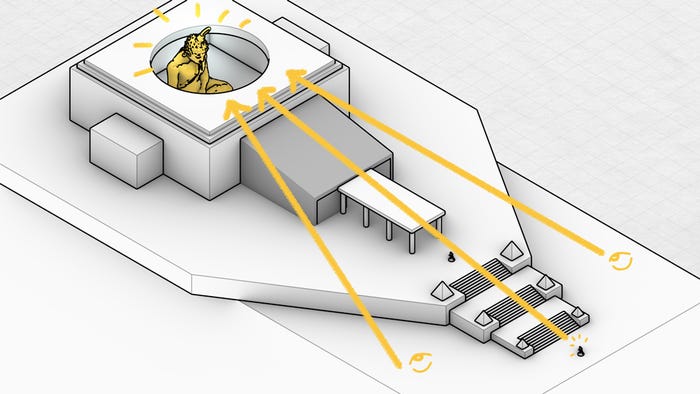
● Step 05:
I did two things in this step:
1- Putting a temporary statue in our temple
2- Lowered the wall height to enhance visibility of the statue for players, thereby heightening the sense of curiosity and adventure.
+ Perspective view:
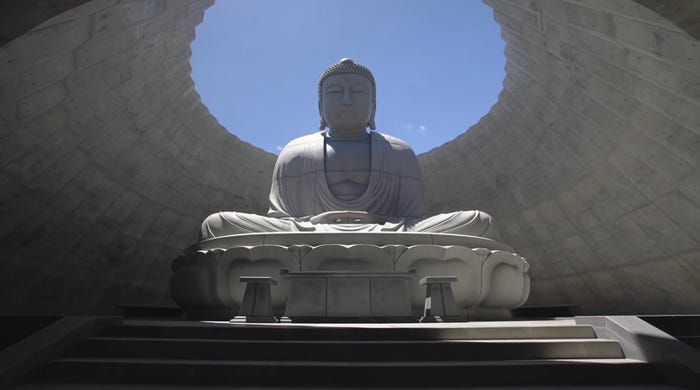
Let me explain the reason of the second action with this image:
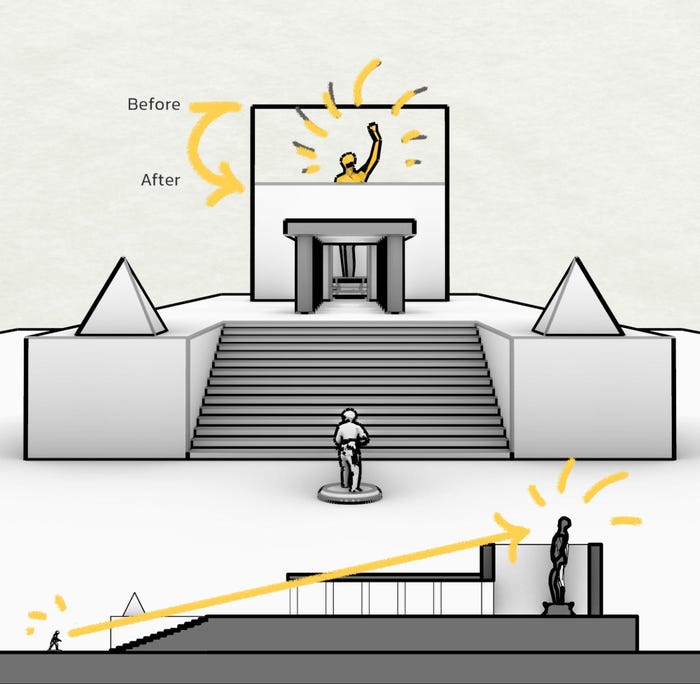
Here’s a real example in Japan:From the start, visitors can view the Buddha's head.
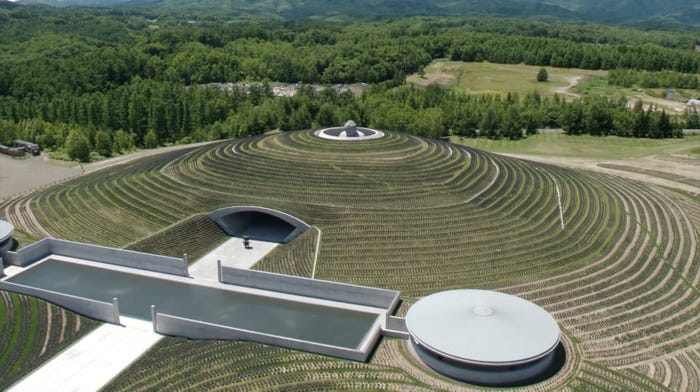
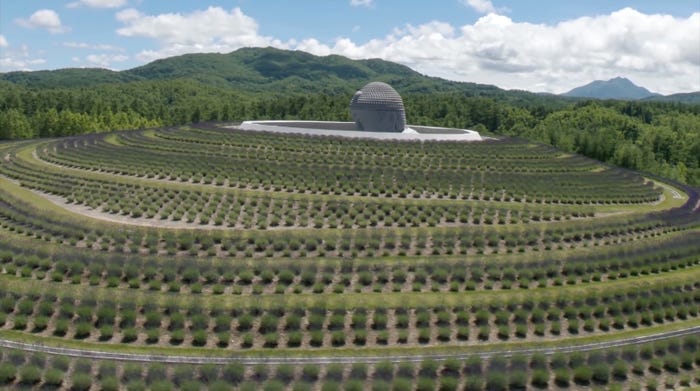
I recommend checking out other works of this veteran architect, Tadao Ando, if you like this temple. He’s the master of creating minimalist concrete buildings. I'm a huge fan of his!
_________
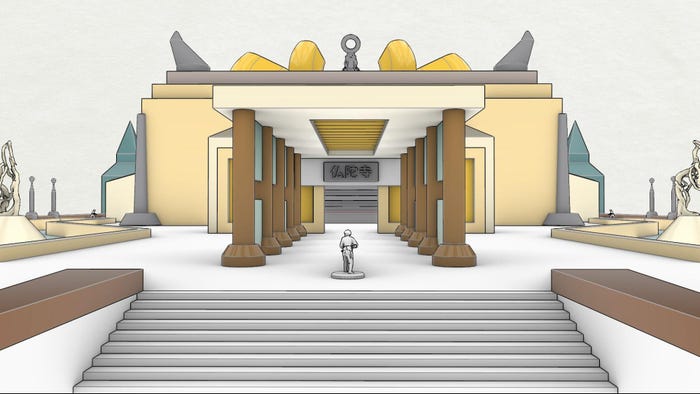
● Step 06:
Figured out what happened? Temple got bigger.
Scale is one of the value factors (alongside of height difference I mentioned in Step 02) and a holy structure couldn’t be a tiny one like others for sure.
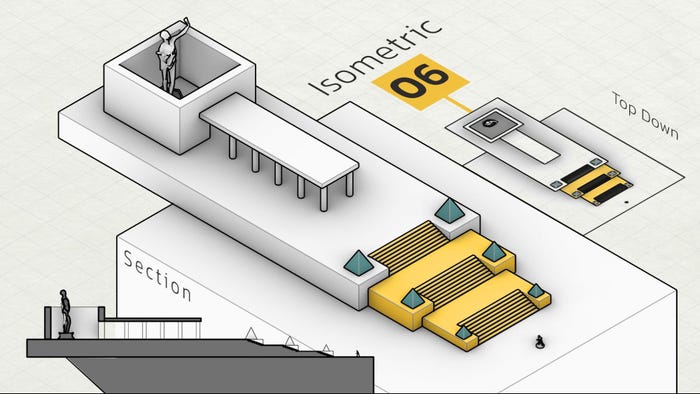
The second change is star cases. I triple and order it from big to small. This repetition makes the main building more powerful, like an ending boss. This tip is also inspired by architecture.

💡 So this step had two lessons: Scale and Repetition
🔸 Question:
What's the usage of «section» in level design?
My background is architecture, so that thing came from my time in college. If I get to the point, it’s very useful for controlling and having a good vision on height differences.We used to think about all those views (2D plan, perspective and section) at the same time while designing everything.Here’s an example:
(Credit)
Everyone has their own workflow, and you have to reach your specialized one (with or without using this stuff), otherwise we all design similar blockouts and that’s terrifying!
I recommend reading Level Design: Processes and Experiences for more details about workflow\pipeline.
_________
● Step 07:
Two actions again:
1- Defining a ceiling with a circle hole in the middle of it
2- Defining side entrances
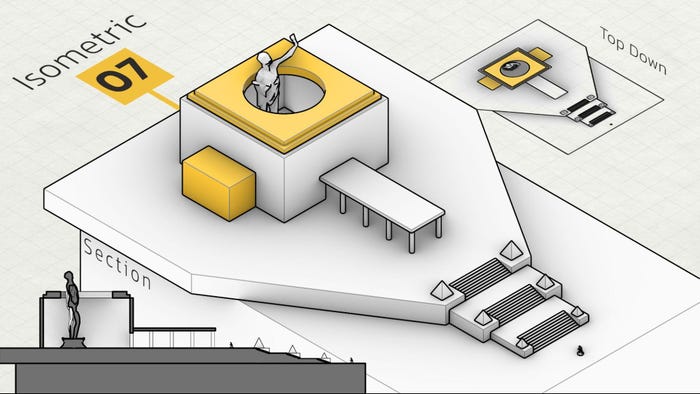
+ Perspective view:
The building's size increased once again. This action will often occur in the following steps, so I won't mention it every time. This process shows how I feel it needs more space than this.
A point about the side entrances I added in this step:
(Credit from this book, Page 68)
🔸 Question:
Why would you not make a square hole in the roof?
A circle has more focus on its own center point than a square. It always says: “hey you! Look at my powerpoint, the center”
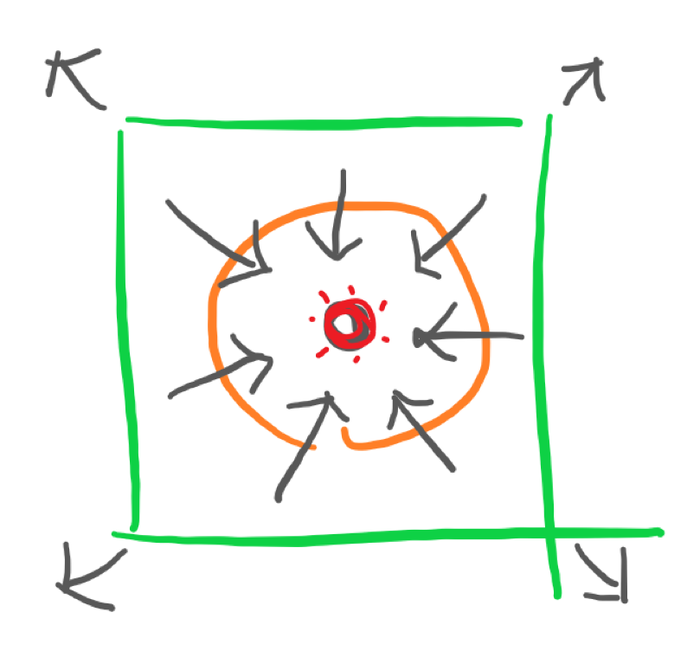
Look at this masterpiece dome for example:
What direction will your eyes take, and where will it end?
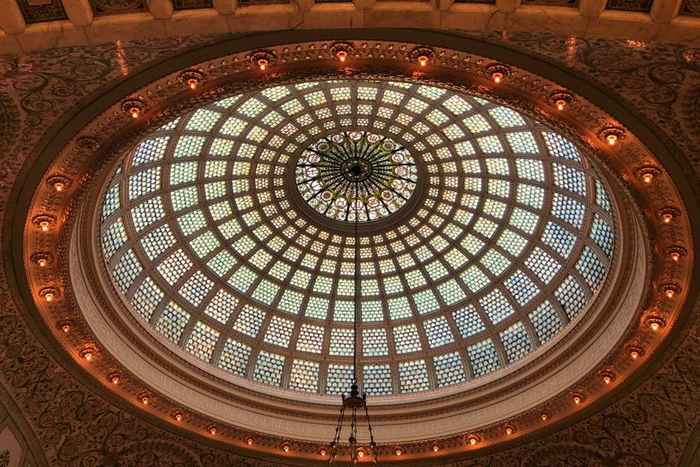
(Credit)
This image helps you too:
(Credit from this book, Page 55)
_________
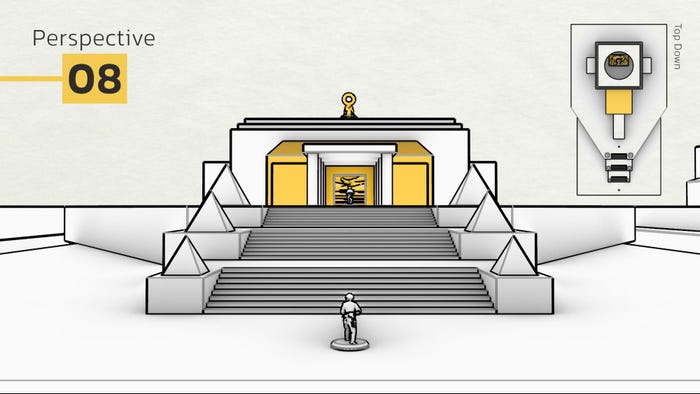
● Step 08:
Extended the main hall with a “closed space” before the player gets access to it.
Changed the statue to something more appropriate for our target. (It’s one kind of Buddha statue)
+ Perspective view:
There’s a beautiful point from “101 Things I Learned in Architecture School” book:
Our experience of an architectural space is strongly influenced by how we arrive in it. (page 30)
🔸 Question:
How much should I extend the main path? Any limitations?
More extend = more time to pass
So there should be a reason for each space you put between the first entrance and the final one, otherwise players will find it pointless and boring.
There are two things I should mention regarding the new statue:
Buddha’s head from outside view
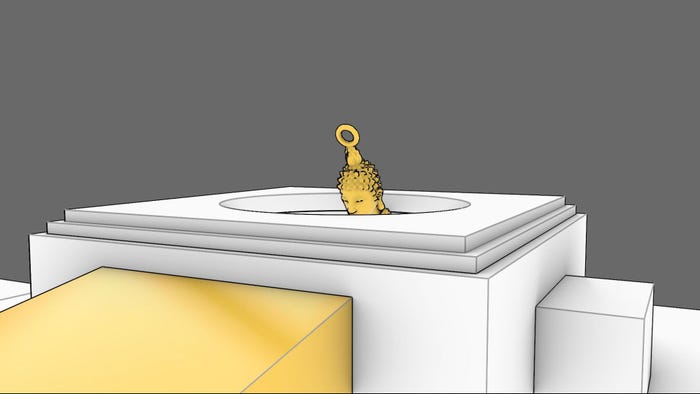
Eye contact of her to the player:
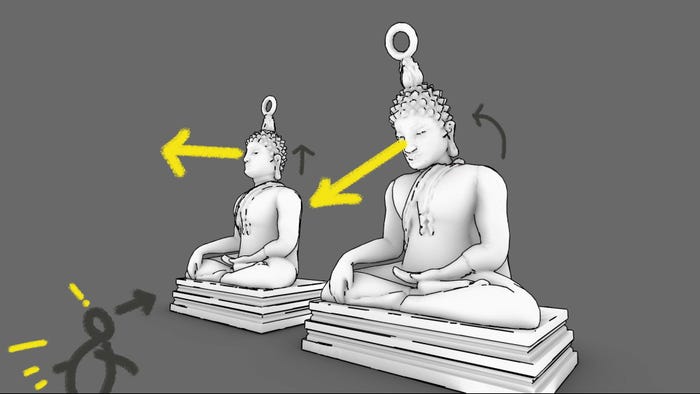
The first model I downloaded is the left one. She looks at the straight path without caring about the player. I respectfully just grab his head and rotate it down a little bit in my 3D software (Rhino).
Now, players can make eye contact with her when they're entering the main area.
Like the reference I showed above:
_________
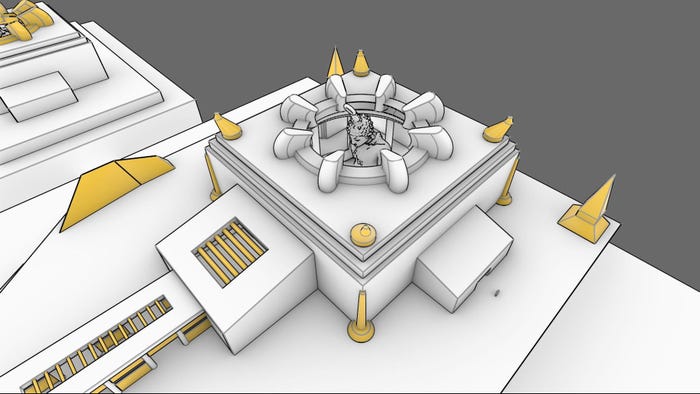
● Step 09:
1- Designing a crown-inspired model on the roof to emphasize the main target
2- Some minor changes

+ Perspective view:
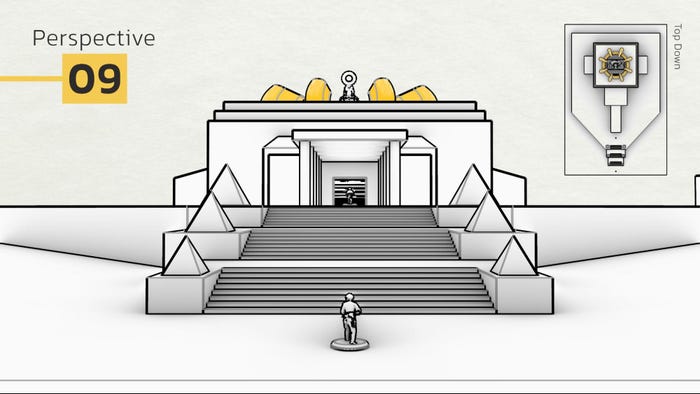
This is how it looks like from the player view:
_________
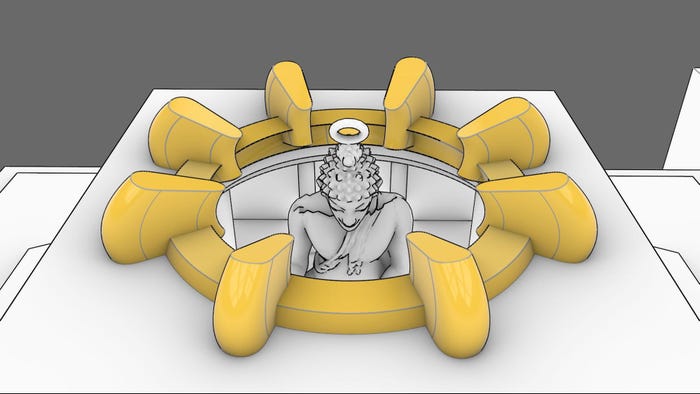
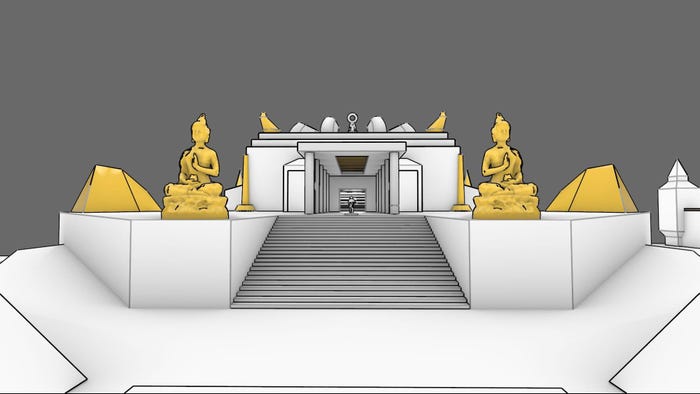
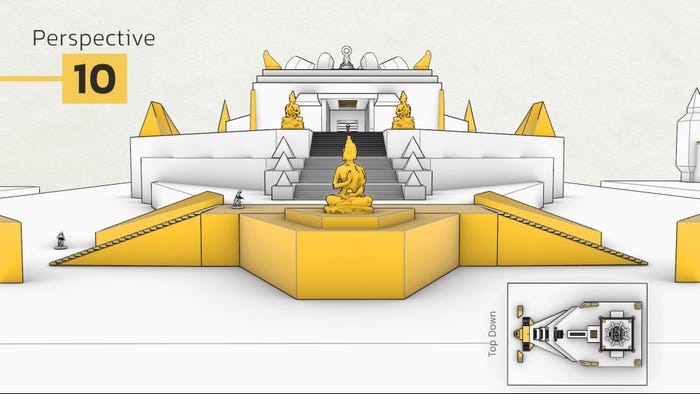
● Step 10:
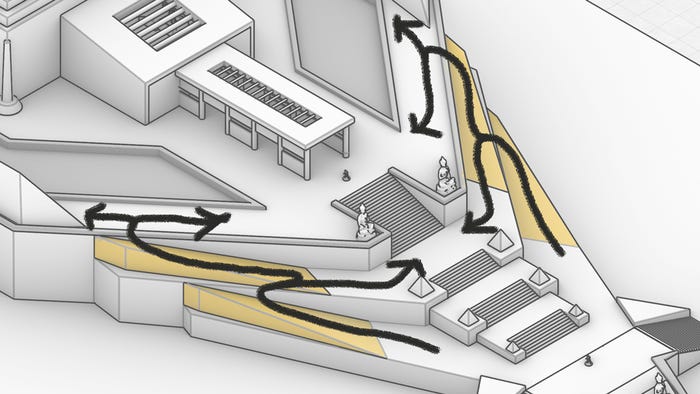
Many changes happened in this step. Let’s check them out one by one from the start point:
1- Adding more height difference with defining a double-sided horizontal staircase

🔸 Question:
Why did you add these extra stars?
Well, when I playtested the previous blockout, I realized I got to the first entrance so quickly and didn’t feel how glorious it was.So I told myself it should be way harder than that to get to the important area like that, and that’s why I came up with this idea.(Watch the walkthrough video at the end of article)
🔸 Question:
Why did you rotate new stairs 90 degrees?
Sometimes you better take the vision of players temporarily and give it back to make them happy.
2- Placing little Buddha statues outside to prepare the gamer for what is to come.
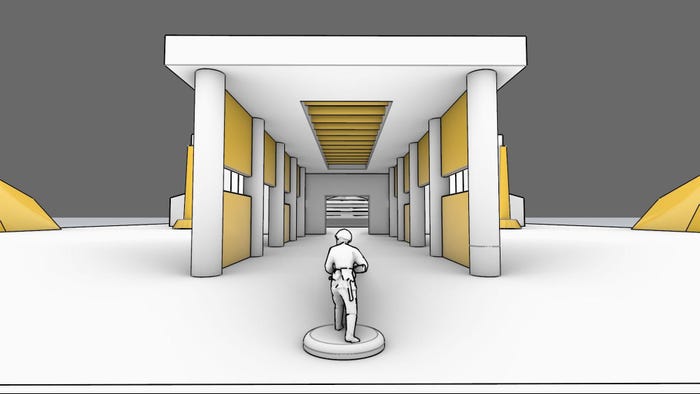
3- Put walls between columns
● Reason: 1)More cover 2)Helping the rhythm
🔸 Question:
Covers for who? There’s no one here except the player.
To be honest I didn’t have time to put AIs (static, patrol, etc) in this level, but there’s a fact: you can use your imagination! :)
Based on those three goals I mentioned above, you can imagine a different encounter setup.
🔸 Question:
What is the “rhythm” you said?
One of its definition could be this:

(Credit from this book, Page 399)
4- A wide hole in ceiling with horizontal pips inside of it
● Reason: 1)Insist on entrance path 2)Makes super cool shadows on the floor (if it’s daytime)
5- Placing basic vertical items on critical corners to emphasize their importance. (None of them is special or theme-related! Don’t worry, dear environment artists can handle them very easily)
A tip about corners:

(Credit from this book, Page 117)
Look at this beautiful corner details from Izumo Shrine:
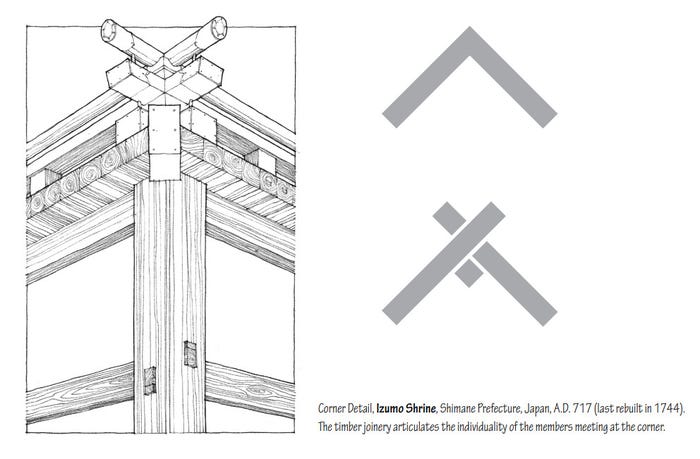
(Credit from this book, Page 118)
_________
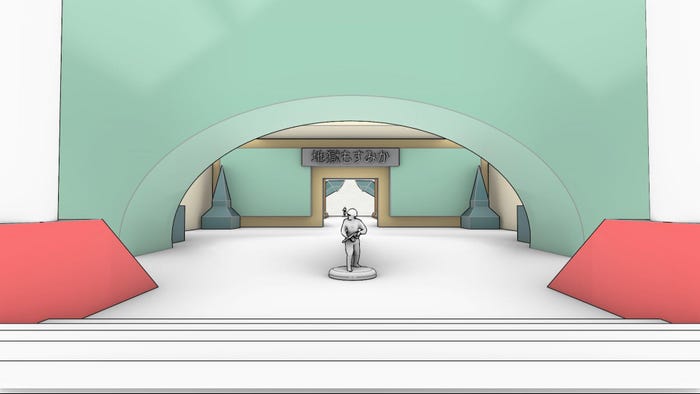
● Step 11:
1- Defined some water placements
Water is one of the key elements of eastern culture. It’s the symbol of clarity, pliancy and flexibility.
🔸 Question:
What’s the usage of those water placements?
Imagine sushi without fish flesh. Could you?!
It’s an ancient building and we should care about the elements of their culture. If you want more combat area on that field, you can just pull out its water and make it low deep or even dry.
Did you know there’s a water temple in Japan?
2- Adding side ramps for flanking
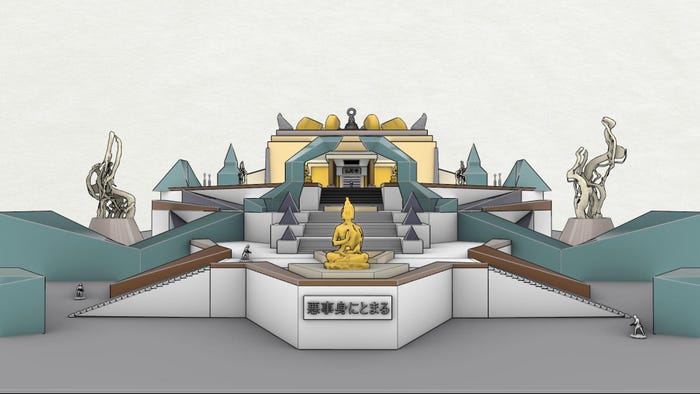
3- Put famous quotes from Buddha with the original Japanese language. The narrator could translate them with a whispering sound during the gameplay.
It helps the player to understand the story behind this temple and feel the local sense of the environment much better.
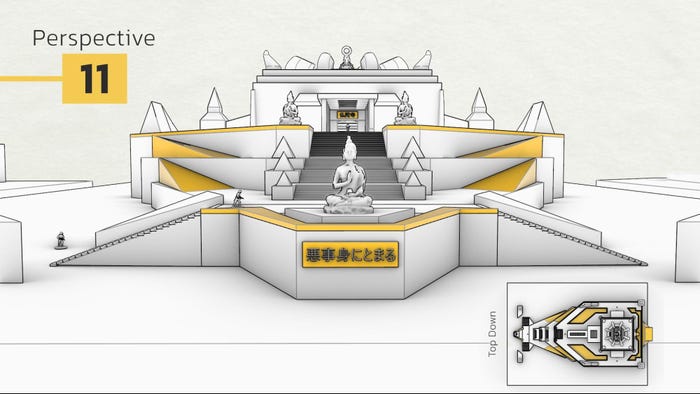
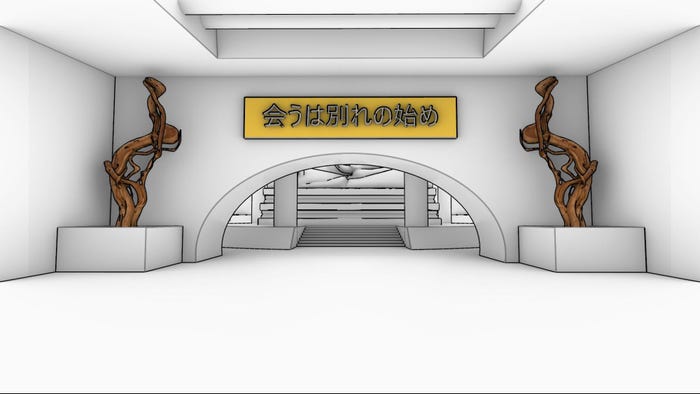
🔸 FYI: These Japanese sentences are official Buddha’s quotes from this website and I just copied them based on their meaning.
For example: the sentence you see in the picture above ispronounced «au wa wakaré no hajimé» which means «Meeting is only the beginning of separation». It’s exactly before our player meets the Buddha. It’s very meaningful and motivational, isn’t it?
Of course, this is entirely the responsibility of the ART team, and they will decide whether to include it or not. So don't be upset if they throw it away! :)
Do you think our design process is finished? I don’t!
Let's see what happens next...
_________
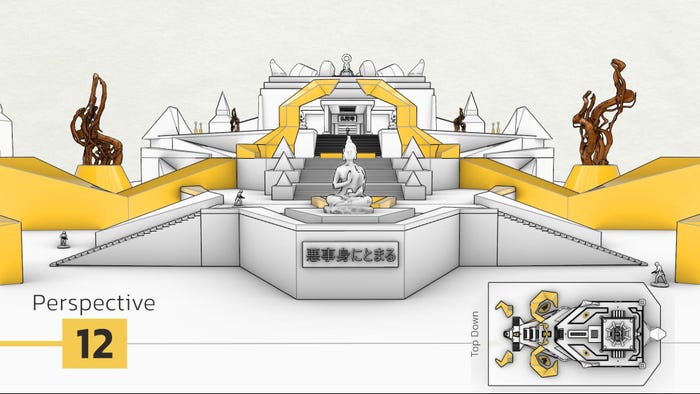
● Step 12:
Here’s the last step I’ll share in this article:
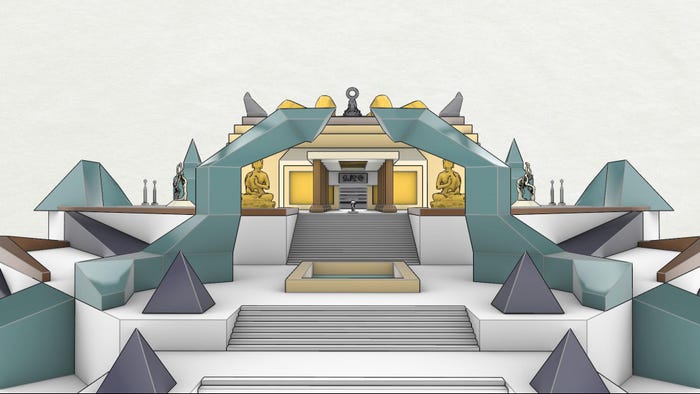
You can see minor changes, but the most noticeable are the items that look like scorpion tails! I didn’t want to model them like that, but I was looking for a unique look for the temple's entryway and I think I achieved that. Kind of!

Those tails that rise up from the ground (they are also side entrances) continue as a gate for framing the main door, like two guardian snakes!
It could be in a more interesting shape, but it’s good enough for this stage. What’s your thought?
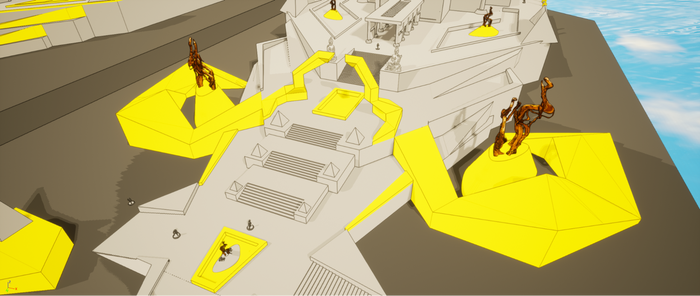

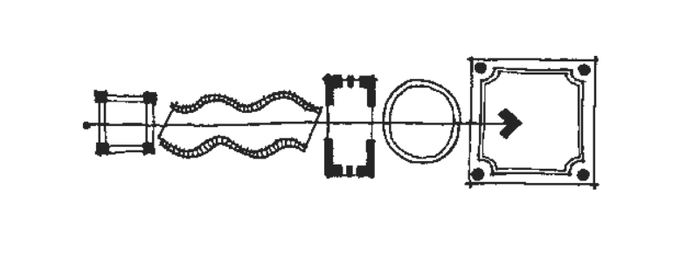
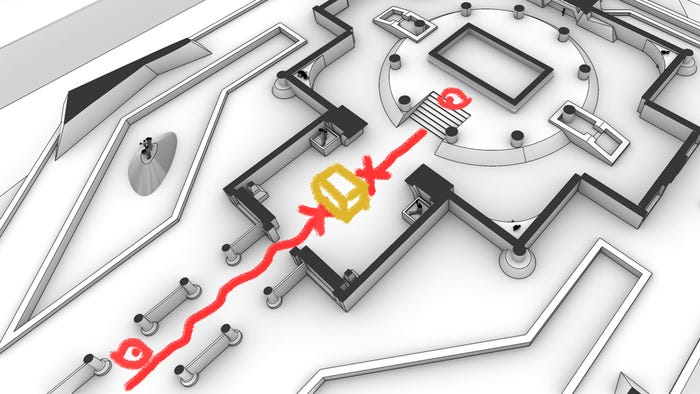
There’s not only one way to go through:
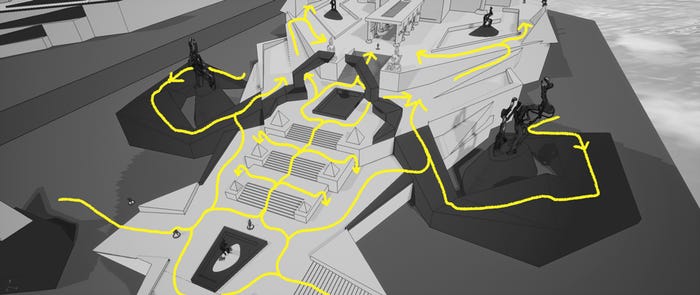
Final layout of inside:
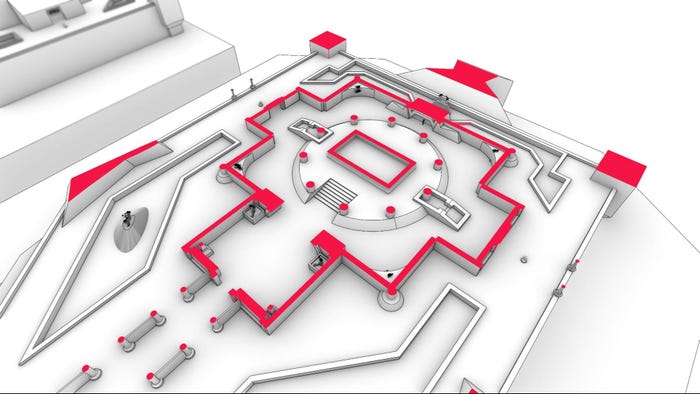
🔸 Question:
Don’t you think the main sightline is too open, from outside to inside?
Yeah, It could be until we have a door for the first entrance. If you decide to delete the door, you can just have a box or any full cover in the pre-entrance room.
Just like this:
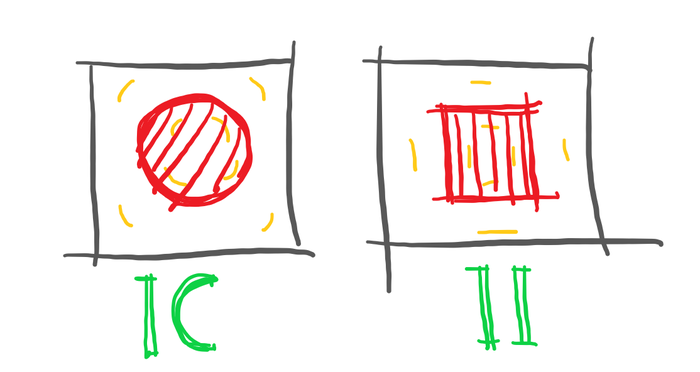
🔸 Question:
Why did you use a circle shape for the base of Buddha in a square plan?
Well, for two reasons:
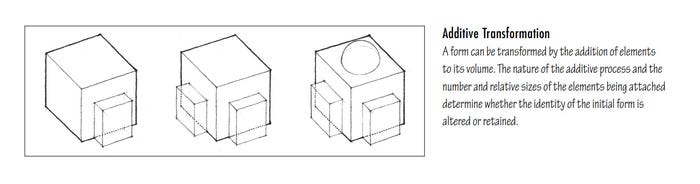
Reason 1) There’s another tip in Matthew Frederick’s book I mentioned it in step 08: Any aesthetic quality is usually enhanced by the presence of a counterpoint. (page 84)

A real example (Villa Capra, Italy):

(Credit from this book, Page 255)
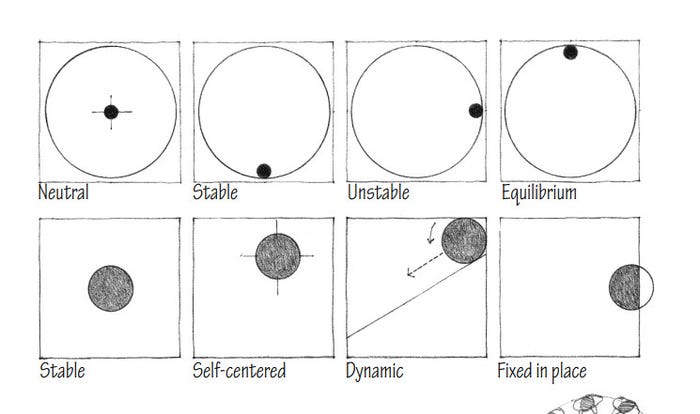
Reason 2:Curved lines always give a more dynamic sense to the player to explore around the target.
According to the image below,
Which one do you think is more interesting to play inside of it?
💡 That was the final step, but it does NOT mean it’s the last change we can do. Lots of more ideas can be implemented on it that are outside this article’s capacity.
● What adjustments do you believe it still requires to be a better temple? (leave your comment down below)
● If your game has mechanics like double jump, flying or stealth mechanics what changes it needs?
Here are all perspective shots in one GIF:
… Oh wait!
💡 Before closing this tab,
Please pay attention to these notes:
This process is just less than %30 of the complete process of a real level design!
So be careful and don’t underestimate this important role. There are many steps you probably engage with in your career, like these:
1-1) Placement of game objects like: NPCs, ladder, rope, secrets, etc.1-2) Many iterations and giving feedback from design team1-3) Map configuration (game mode, data packs, KillZ, boundaries, etc.)
1-4) Many playtests and communication with QA team
1-5) Support through the art pass1-6) . . .
You can use every single of those tips in different blockouts separately, without any order.They do NOT stick together and each one has its own identity and meaning.
Level design is NOT architecture design!
You saw many architecture tips In this tutorial, but it does NOT mean that’s the only point we should care about in the world of video games.I wanted to make a cool gameplay with the help of this package, but I was out of time to be honest! Took a lot of time to write, visualize and edit based on feedbacks.
No worries, I’ll do it in the next part for sure.Don’t miss the senior’s feedbacks at the end of the article! :)
_________
● Extra Step:
Coloring the environment based on a color palette:
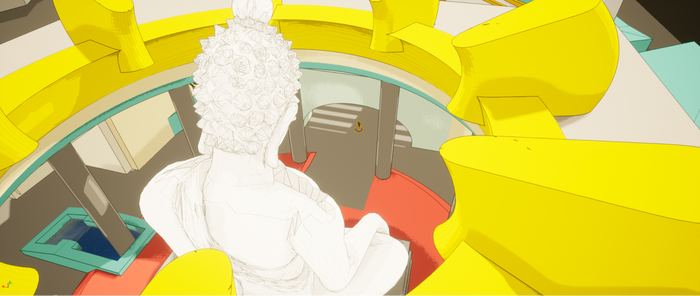
At the end…
Say hi to our magnificent Buddha! :)
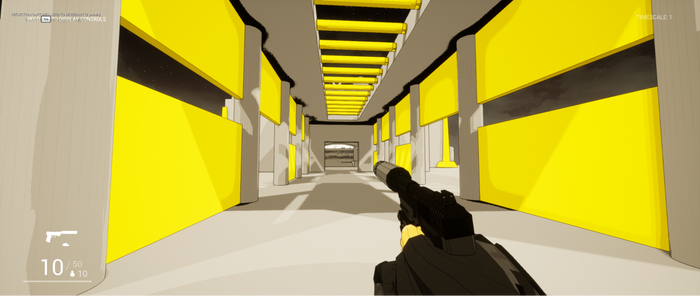
📹 Here’s the final step’s walkthrough in unreal:
_________
● Bonus: Seniors feedbacks
What do seniors think about this article?
I’d asked them 3 questions:
Vasiliy’s suggested link:
Let's Design Series by Max Pears

Jeroen’s suggested link:
An Architectural Approach to Level Design by Christopher W. Totten
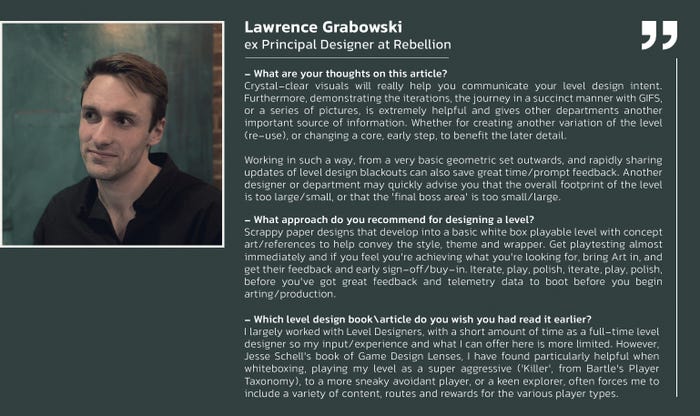
Lawrence’s suggested link:
The Art of Game Design by Jesse Schell
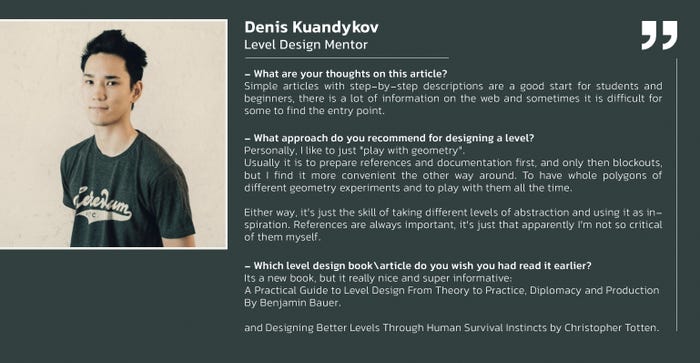
Denis’s suggested links:
1) A Practical Guide to Level Design: From Theory to Practice, Diplomacy and Production by Benjamin Bauer
2) Designing Better Levels Through Human Survival Instincts by Christopher W. Totten
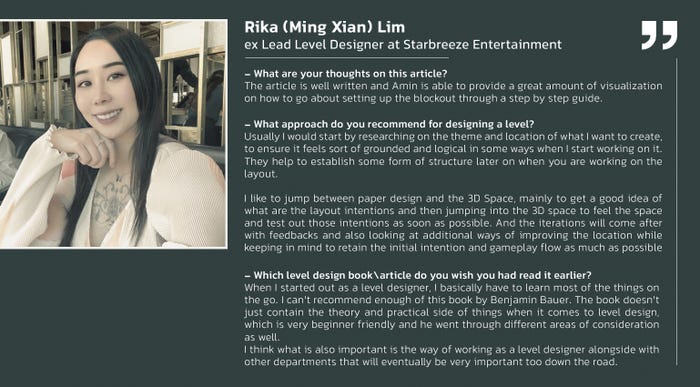
Rika’s suggested link:
Trailer of Benjamin Bauer’s book on Youtube
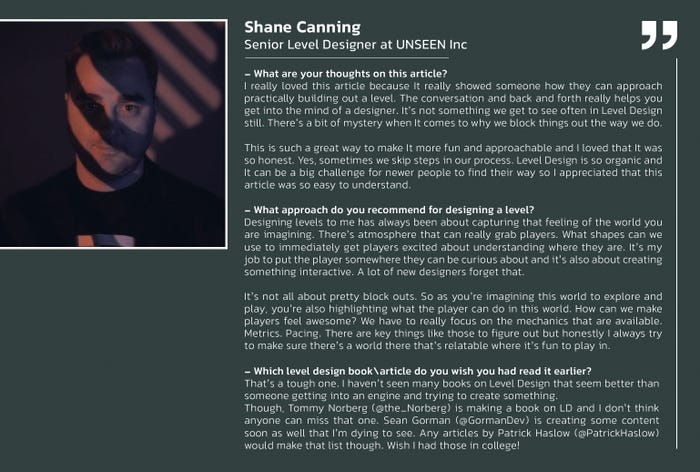
Shane’s suggested links:
1)Tommy Norberg's Twitter (Extra: one of his interesting thread link)
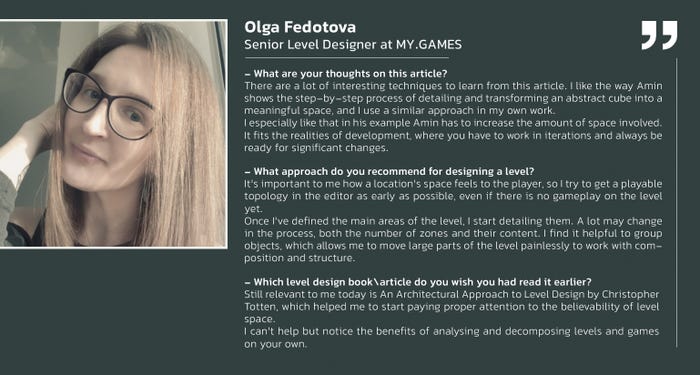
(Olga’s suggested book link is already in Jeroen’s link)
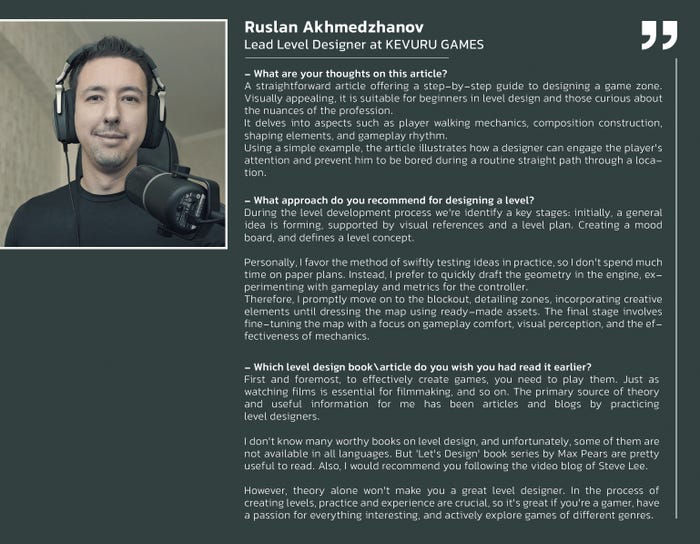
Ruslan’s suggested link:
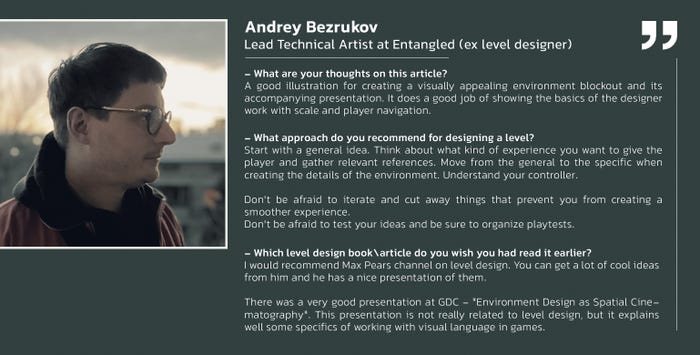
Andrey’s suggested links:
1) Level Design Lobby Youtube channel
2) Environment Design as Spatial Cinematography: Theory and Practice GDC talk
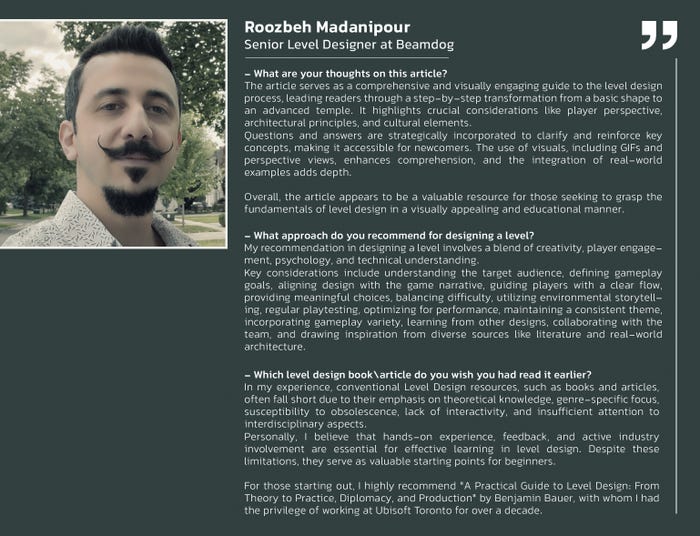
(Roozbeh’s suggested book link is already in Denis’s link)
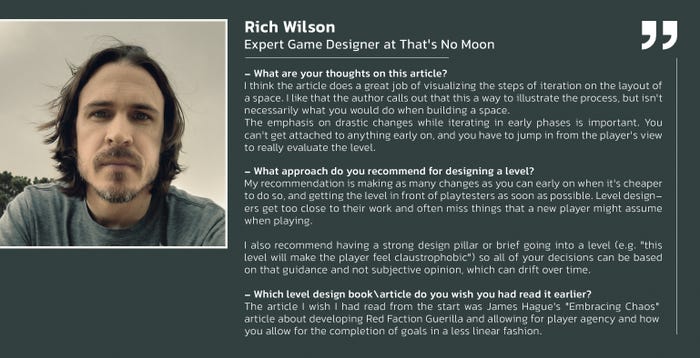
Rich’s suggested link:
Embracing the Chaos: Freedom as the Cornerstone for Open World Mission Design
Wow! I really didn’t expect this bonus part to become such a significant and useful part like this!
I’m thankful to all the wonderful designers who put their valuable time on this article, gave feedback and contributed to the quote section. 🙏🏻
_________
Tools used:
● Rhino v8
● Photoshop
● Unreal Engine
Models reference:
💡 If you're curious about my presentation style, I wrote another article about this subject especially with this title: How to Present Levels for Your Portfolio?
_________
⭕️ The Last Word:
I know some of you (mostly Seniors) may have major critiques for this article, but I would say according to what Annie Duke says in her book "Thinking in Bets", we should separate the decision and the result from each other.
I think the decision I made (writing an article about the level design process) was right and our community definitely needed it, but maybe didn't achieve the perfect result seniors or leads expected to see.
It's natural and I totally accept it, but it’s not an excuse for remaining imperfect! I planned something very special for the next part in my mind :)
In the next part, Level Design Process 02, I'm not the one who works on it. That means for writing the next part, we are a team of level designers with different skill sets and continuing the process together. Yes! That's what I like to call "co-writing".
Keep in touch until then 🤘
Sincerely
Amin
▶️ I’m open to chat! Feel free to contact me if you have any question or feedback (even harsh ones!) about this article: Gmail, ArtStation, Twitter, or LinkedIn.
Read more about:
BlogsAbout the Author(s)
You May Also Like


